Tile Leveling System: The Secret to Flawless Tile Installation
Views: 0 Author: Site Editor Publish Time: 2025-12-09 Origin: Site
Tile Leveling System: The Secret to Flawless Tile Installation
Today, I'd like to share with you a seemingly small but crucial tool in the world of renovation - the tile leveling system. Many homeowners may have noticed that after laying tiles, tile installers often insert small white plastic pieces into the tile joints. These are the heroes we're focusing on today, and their importance far exceeds our initial impressions.
Several years ago, during my own home renovation, I encountered the frustration of uneven tiles. After the living room tiles were installed, under the light, it was clearly visible that the edges of several tiles were not on the same plane - some were higher, others lower. This not only affected the aesthetics but also created a tripping hazard. It wasn't until the workers re-did the installation using tile leveling clips that the issue was resolved. Since then, I've developed a keen interest in this small tool.
How Tile Leveling System Works: Precision Adjustment and Fixing
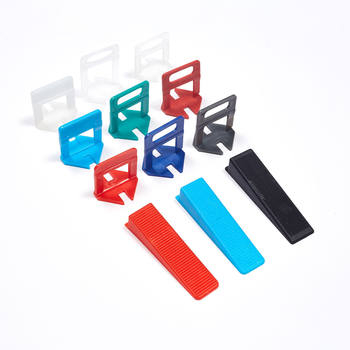
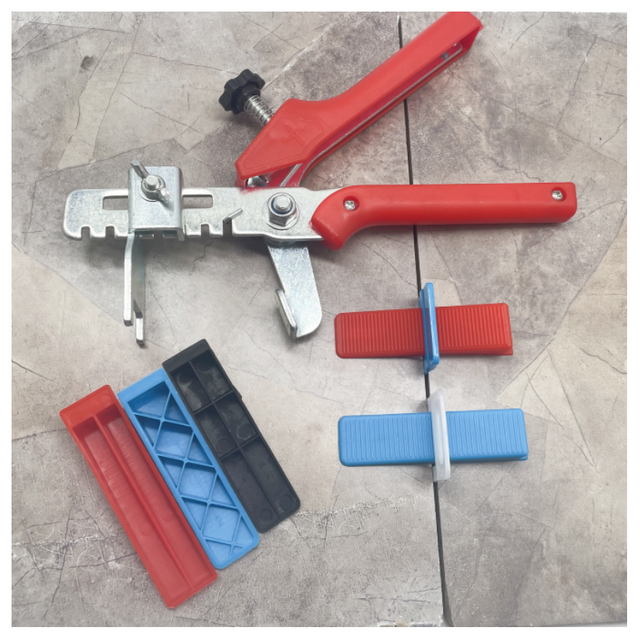
The tile leveling system, also known as tile leveler spacers, typically consists of two parts: a base (also called the leveling base) and a wedge (also known as the adjustment piece). Its operation is simple yet highly effective.
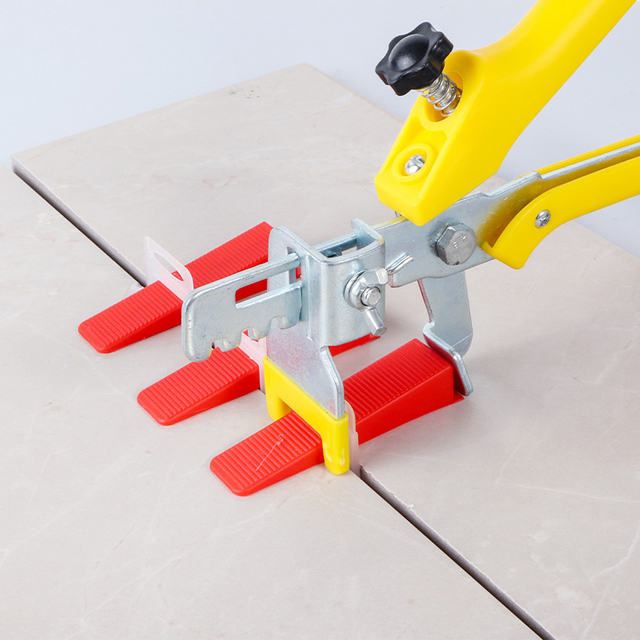
When the tile installer lays tiles on cement mortar or tile adhesive, they place a tile leveling system base at the cross-joint of every four tiles. This base lies flat beneath the tiles. Using a specialized tool or by hand, they then insert the tile wedges into the slots of the base. As the wedges are pushed deeper, they create downward pressure, pressing down on the edges of higher tiles while the base provides support to adjacent tiles, ultimately ensuring all four tile edges reach the same height.
This process can be likened to performing a "mini makeover" on the tiles. Through mechanical adjustment, it forcibly levels uneven tile joints and firmly fixes tile positions before the adhesive sets, preventing any movement due to gravity or during construction.
Why Use Tile Leveling System?
This primarily stems from the characteristics of tiles themselves and the construction environment.
Firstly, there's the tile flatness issue. Even tiles from the same batch and brand may have slight bends or warping edges, imperfections often unnoticeable before installation. When multiple tiles with subtle flatness differences are installed together, these discrepancies become magnified, creating noticeable "steps."
Secondly, there's the unevenness of the base layer. It's challenging to achieve perfect flatness on our home floors or walls. Additionally, the thickness of the adhesive material (like cement mortar) used during installation inevitably varies. These factors can all lead to uneven tile surfaces post-installation.
Types of Tile Leveling Systems and Selection
In the market, tile leveling systems come in several types based on functionality and design:
Standard Cross Tile Spacers: The most basic and commonly used type. Besides leveling, they often include disposable plastic crosses to control tile joint width. Sizes typically range from 1mm to 3mm, allowing selection based on desired joint width.
Rapid Tile Leveling Clips: These feature a more sophisticated design, with larger bases and longer adjustment travel for wedges, providing stronger clamping force. They're especially useful for large-format tiles (like 750x1500mm or 900x1800mm), effectively handling tile warping.
Butterfly Tile Clips: Shaped like a butterfly, these not only adjust height differences but also allow slight plane adjustments to prevent hollowing at tile centers. They're usually used in conjunction with standard tile leveling clips.
When selecting tile leveling clips, consider:
Tile Size: Larger tiles require stronger and more robust tile leveling clips.
Tile Quality: If tiles have inherent flatness issues, a high-performance tile leveling system becomes essential.
Construction Materials: If using cement mortar with significant shrinkage, the tile leveling system must provide lasting fixation to prevent tiles from being pulled down during drying.
Generally, high-quality tile leveling clips are made from durable plastic that's flexible yet strong, resistant to breaking. The wedges and bases should fit smoothly and snugly, without easy loosening.
Correct Steps and Methods for Using Tile Leveling System
Even the best tools require proper use to be effective. Here are the standard steps for using tile leveling clips:
Step 1: Prepare the Surface. Ensure the base layer is clean and flat. Mix tile adhesive according to specifications.
Step 2: Apply Adhesive and Lay Tiles. Spread adhesive on the base or tile back, then use a notched trowel to create even ridges. Place tiles in position, press gently by hand, and tap with a rubber mallet for full adhesive contact.
Step 3: Insert Tile Leveling Clips. At the cross-joint of four laid tiles, insert the tile leveling clip base, ensuring it sits flat beneath the tiles.
Step 4: Insert Tile Wedges. Place the tile wedges into the base slots, then use a tile plier or hand to press them down until all four tile edges are level. Apply even pressure to avoid tile cracking or uneven settling.
Step 5: Clean and Cure. During installation, promptly clean excess adhesive from tile surfaces with a damp cloth. After installation, allow curing time without foot traffic.
Step 6: Remove and Grout. After 24-48 hours when adhesive is fully set, gently tap out tile wedges with a rubber mallet, then remove the base. Proceed with grouting.
Common Mistakes and Precautions
When using tile leveling clips, avoid these common errors:
Premature Removal: Removing tile leveling clips before adhesive fully sets may cause tile displacement due to gravity, undoing all effort. Always wait patiently.
Excessive Force: Overly forceful insertion of tile wedges can cause tile cracking or create new unevenness.
Neglecting Base Preparation: Tile leveling clips address local height differences between tiles. If the entire base layer has significant flatness errors, tile leveling clips alone won't solve the issue - base leveling must be done first.
Reusing Components: Most plastic tile leveling clips are designed for single use. Forcing reuse may cause structural fatigue and loss of leveling effectiveness.
With the tile leveling system, achieving perfectly flat tile surfaces is no longer a challenge. Whether you're a professional installer or a DIY enthusiast, mastering this tool will significantly enhance your tile installation quality.